Showing posts with label stitches. Show all posts

Sunday, October 12, 2014

Arrowhead Stitch Tutorial

If you tuned into some of my last posts, you'll remember a "brief" mention of a certain "Arrowhead" stitch.

If memory serves, this is my first embroidery stitch tutorial--so bear with me.

The example you'll see below is actually a part of Doodleplex. I'm using this tutorial to add a little miscellaneous embellishment to mix things up.


Let us begin:

First, make a long stitch (or line of long stitches, depending on how big the shape is and if the center line is straight/curved) down the center of the area you want to fill.
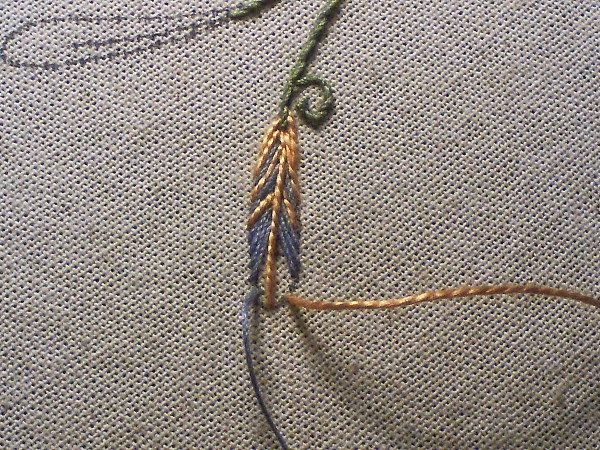
In this case, that would be a McGyvered flower/leaf thing near the edge of Doodleplex Part II:


Next, you make two stitches at the "bottom" of your shape, for as long as you can go while following the outline. Sink the needle either in the same hole as the first big stich or underneath the thread as close to the hole as possible. In this case, because the leaf I'm trying to fill has such an elongated shape, my stitches are long compared to the shape of the leaf:

(please forgive the horrible picture, I couldn't get my camera to cooperate)


Afterwards, keep filling in the shape with stitches parallel to those bottom two stitches. Your stitches should start at the outline (or slightly outside of the outline depending on preference/desired effect), and end under that big stitch down the center.


And just continue that way until you get as far as you want.


If you want an arrow like finish, just keep stitching until you're sinking stitches at the very end of that long stitch. If you want a rounded finish (as seen here), adjust the angle and the length of your stitches when you get to the rounded portion of your shape.


Out of curiosity, I tried stitching a leaf the opposite way. Parallel stitches first, and then the long stitch down the center.

First off, I made a mistake and made my bottom stitches waaaaay too long, so if it looks funny there's a 95% chance it was due to an error on my part.


Other than that, I'd say the effect was very similar if not the same. So, whichever works for you should turn out just fine.


^_^

Sunday, September 28, 2014

Doodleplex must NOT be forgotten.

However, I am sad to admit that I often do forget not so little 'ol Doodleplex...

But, here you can see the beginning of the last "round" of Doodleplex Part II:

Actually, now that I think about it it's the end of the "second to last" chunk of Doodleplex Part II.
I did jump the gun a little, though, and thread the three colors I want to use for the "tree"... who knows if I'll be able to use it this stitch session, though.

Here's a shot of the first stitches!


Anywho, the main chunk of this post is dedicated to the purpose of me complaining about my bizarrely sudden struggles with the fishbone stitch in the "leaves" above the flower.

In case you don't recall (and I'd be surprised and impressed if you did recall), I've already had some practice with fishbone stitch back in Doodleplex Part I:


and:


I was positive it would work the same here, but it wasn't until I started in on it that I realized that the shape of the "leaves" I was trying to fill were gonna be an issue.

And I went through a few different versions of stitches until I finally seemed to get a hang of this one specific stitch that I came up with one the spot. I haven't seen said stitch before, so I'll just go ahead and coin it.

I call it: Arrowhead stitch (displayed here in the green-yellow leaf).


Note: it's called the arrowhead stitch because of the "theoretical" appearance. Though, so far it looks like a feather or fluffy bunny tail (center leaf).


Why Arrowhead? Well, there's already a feather stitch, and "Arrowhead" sounds more epic than "fluffy bunny tail stitch"

Anywho...since I'd already threaded some thread for the "tree", I didn't exactly finish all of these leaves.

I did get to use that tree thread though.

Therefore, at the end of a marathon stitching session, I give you:


Tutorial on Arrowhead coming soon! ( © Karla Barraza)

^_^

Sunday, September 16, 2012

VICTORY!!!!!

So, a few months ago, I found this nifty video on YouTube that told me how to turn sharp corners in bobbin lace, and it was sooo cool because I hadn't seen how to do this before.

Then, I forget about it.

Last week, I remembered it, yet I couldn't think of the name. I could've sworn it was "double stitch" or "punto doble" or something along those lines--> see, because I was being honest with myself and admitting the fact that sometimes if I read something in Spanish, I remember that it was in English even though it was in Spanish. Also, I remembered thinking: Huh, I haven't heard of that before. What is it? 

So yesterday, I'm scouring YouTube for forever and a day--and nothing. I can't find the friggidy frackin' son of a biscuit video anywhere.

And it's driving me crazy

I can't find it, therefore I can't get it out of my head. 

So, today, I was all: screw it I'm gonna google it, and may be that'll give me better results. 

An hour later, I am proud to present to you: 

THE BACK STITCH!  (So I was a little off, whatever...)


^_^

This makes me feel better about yesterday's tragedy. 

Sunday, June 3, 2012

Bleh (continued)

So, the offending stitch is listed here in The Encyclopedia of Needlwork (Thérèse de Dillmont) as the sixteenth lace stitch. Let the boos resound.

Here were my first attempts:
As you can see, the bars (damn them) are vertical and not at the angle that I would so like them to be.

So, after very much frustration and very many headaches, I decided to look again at the picture of the stitch--several times-- to no avail.

At last, after much struggle and torment, I caught sight of text below the image and thought "Oh, what could this be?"

Note to self: It's a good idea to read the instructions
Though still not perfect, I've managed to wrangle the little devils into better-ish shape: 

It turns out that I was making the knot at the top of the loose buttonhole and working down when I should've been making it at the bottom-middle-ish of the buttonhole and working up

Oh, btw, the way I've been practices stitches is with a piece of canvas. What you do, is you essentially sew the edges into the canvas and work the stitches over the top. I like canvas because of the open weave which makes it easy to measure the distance between stitches --> which is good if you're semi anal-retentive like me. 

Thursday, May 31, 2012

Phase 5

So, as I said before, I am in Phase 5 of le masterpiece:


As you can see, I've already done the ground (Phase 4) in Point d'Espagne and am now working on the filling stitch for the weird flower/umbrella/octopus type thing. So far, I'm keeping it simple and just using a really close corded buttonhole, but I'm thinking that in the big flower/umbrella/octopus type thing that I'll branch out into maybe some knotted stitches or something...


Any suggestions?

Monday, April 9, 2012

pretty pretty flower

Hiya there, so, I've been working on a little project that took waaaaaaaaaaaay longer than it should of, what with school and all. It was smaller than the palm of my hand, but then again priorities are priorities =)


   So, on your left you see the pattern. It's been sewn onto the backing (two pieces of fabric) and pricked to make the couching easier. Also, though you can't see it, I sewed another piece of paper (normal notebook paper) onto the back so I could see the pricking on that side also.
The great thing about needle lace is that you can make just about anything. It's great for free form shapes.

   Here, I've already finished the filling stitches. (I forgot to take the picture of the plain outline, whoops).  The dense part is a corded Brussels stitch, with a single Brussels stitch along the edge of the outline to give it that sort of suspended effect. I learned it from here. You can see the same effect on the left hand side of the picture, where the stitching is dense. The lighter area in this picture is a questionable pea stitch. it was definitely an educational experience.
 Tada!! In the final stages of production, I have finished the buttonholing and now need to remove it from the backing and fix up a few details here and there.
Also, that loopy thing on the right hand side is not a pitiful excuse for a picot, but a loop for a clasp. I was thinking of selling this, but I screwed up a couple things and I honestly couldn't turn it over unless it was as well made as possible.


She lives!!! =D
What felt like a month later, and it's done. Muahahahahahahahaha =D

Tuesday, March 13, 2012

First genuine attempt

Okay, so this time I actually just made something to make it, and to try to get a little fancier. I think it turned out pretty good, and I have to say that it took an insanely long time to make it, what with school and all. Counting only pure labor it took like... somewhere upwards of 15 hours to make (that's a loose estimate) give or take three or four hours--But all together it was somewhere like maybe three weeks or so.

 So, let's see what we have:

The solid areas area a very closely packed whipped buttonhole stitch. The netting is a point d'espagne (single twisted buttonhole stitch) and the edges are just your typical single brussels stitch, except just on the outside of the lace instead of the inside.

The edging was one of two new things that I tried. The second was the thin bars connecting the little loopy things in the middle of the design. Those are called Sorrento bars --> which I will soon post pictures of (really, I already have some sample stitches ready).

All in all, I think it turned out okay. Any comments?


Thursday, February 23, 2012

Succeeessss!!!!

Muahaha, the third time's the charm!!


It took me a while to figure out the pattern, but I eventually came up with this funky octopus type thing (left) and maybe I forgot to take pictures of it until after I started couching the outline...


And maybe I forgot to take pictures of everything else during the process... buuuut, I did manage to remember to take pictures before I gave it away =D
The filling stitches are a double Brussels stitch (I promise that I will post pictures sometime within the distant/near future/alternate time stream).


I decided not to make them identical, not really sure why, but I figured it looked kinda cool. I padded the outline with nylon thread, but they were still kinda flimsy (as you can see in that funky twisted thing on the left earring.


I do believe I smell progress in the air ... ^_^

Sunday, February 5, 2012

recent doings and such

 So, school is intense. I've been busy, busy, busy and I mean busy for the past few weeks and by the time I remembered my little ol' blog over here, I was either sprawled across my bed hovering ever so rapidly towards unconsciousness, or I was vegetating after a brutal test.

Buuuut, here's just a rundown of what I've been up to:

Seen here in a state of deconstruction, this was originally meant to be a gift.
To be brief, we had words, and I won.
I had a problem with the yellow and white part of the design. Aside from the fact that, in retrospect, the color combinations were not exactly great, I'd screwed up the circles while I was laying the couching thread and it made my life miserable during the buttonholing.
May it rest in peace... (not).


 At your right, you will see gift 2.0. Everything with this one went great. I got the pattern down, the buttonholing wasn't over complicated, buuut upon release from the backing, it turned out that it was too flimsy for my intended use (an earring) and, out of nowhere, the outline broke on me.
Let's just say that it's sleeping with the fishes and leave it at that.
Here, I give you a successful project. The quarter circle in the bottom corner is just your average single Brussels stitch, while the squiggly thing on the right is a corded Brussels stitch, and the squiggly thing on the top is a double Brussels stitch. The ground is an attempt at a point d'espagne  while the thing in the circle is a spider I learned from this comment at Needle Lace Talk's lace stitches group. (BTW, I couldn't link to the comment itself, but it's dated Dec 12, 2011)

Anywho, I hope to be able to at least make another post before the world ends in December (=P), but I gotta tell you I'm just trying to focus on not getting carpal tunnel from all the notes I have to take for school 0.o


Friday, January 13, 2012

First Flower Part 2

Hey there, ho there, hi there! =P I am happy to say that I have managed to scare up some nifty pictures of my latest masterpieces (o.0)


 So, the little, denser petals are a double buttonhole stitch, while the bigger petals are essentially the thread coming out from the outline (starting from the center of the flower), making one button hole stitch, going into the outline on the other side, starting a new row, and making two stitches on each side of the first stitch--and just alternating that (one stitch, two stiches, one, two, one, two, yada yada yada). I did that because I didn't want an big thick line running down the center of the petal to show the stem, so I tried to get my gears churning... and I think it sorta kinda works. Yay? Nay?
Back on the ranch, I don't know if this stitch is shown anywhere else (probably is, but who knows?), therefore I hereby christen it......(drum roll)......cracked stitch! (it looks kind of like a crack, doesn't it? ...or is it just me? =D)

                                                                  ^_^